Introduction
From our entire team at VolThemes, we want to personally thank you for purchasing/upgrade VT Blogging Pro!
We built this theme for everyone. It is perfect for newcomers to creating a WordPress site.
Code is only poetry to people who know what it all means. To everyone else it is a strange and very foreign language. We get that and built everybody’s requests right into the front end options. For all our seasoned WordPress pros, we know how frustrating it can be trying to finish a client’s project. We think you’re about to discover you can go from start to finish faster than ever and produce a smashing looking site in far less time than you ever thought possible.
Note: Be sure to refer to the information outlined in the following documentation for the VT Blogging Pro theme while building your new site. We have explained much of what you need to know to create great looking pages easily using the features built into the theme with you in mind. If you cannot locate the answer here, login to our support forum. We do not answer support questions on Creative Market neither via email.
Let’s get the theme installed on your site!
GETTING STARTED
Once downloaded, you must unzip/extract the theme package file to access the individual theme file you’ll need to install the themes.
To install your new theme you must have a working version of WordPress* already installed.
For information on how to install the WordPress software, please visit WordPress Codex – Installing WordPress.
You can install VT Blogging WordPress theme through your WordPress dashboard, like you would do with any other WordPress theme.
Installing Theme
Installation Requirements
-
This theme required WordPress at least 5.4.2. It’s highly recommended that you have the latest version of your WordPress installed.
When you are ready to install your theme, you will first need to upload your theme files. When you have uploaded your theme, you will need to activate the theme itself. There are 2 ways to upload your theme files:
Step 1: Install Theme Via WordPress Dashboard
2. Click ‘Add New’ and select the ‘Upload Theme’ option
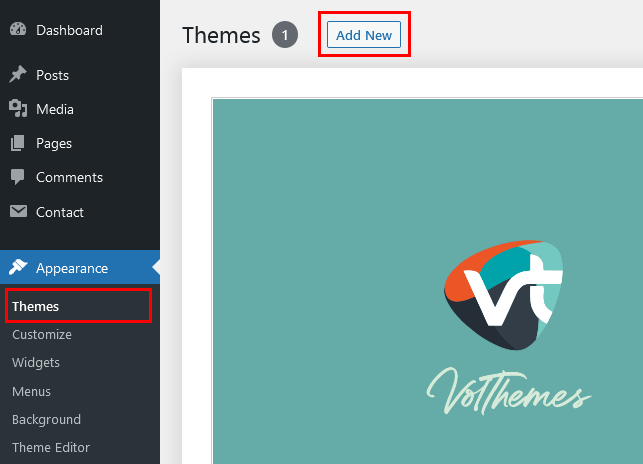
3. Choose the vt-blogging-pro.zip file and press ‘Install Now’.
4. Click Activate it.
5. Go to ‘WordPress Dashboard Appearance Customize‘ to get started customizing theme.
If you face any problem during upload through dashboard, please upload the theme using FTP as guided below.
Step 2 (Alternative) : Install Theme Via FTP
2. Go to the
/wp-content/themes folder of your WordPress installation3. Extract the
vt-blogging-pro.zip file in the theme package and put in /wp-content/themes/ folder4. Go to ‘WordPress Dashboard Appearance Themes‘ section, Click Activate to use your new theme right away.
5. To get started customizing the theme, go to Appearance Customize
Child Theme
We have attached a basic child theme to the download package which contains the minimum of required files. If you are planing any code customization we highly recommend to do this inside the child theme! Learn more about Using Child Theme.
For minor CSS changes, you can also make use of the Custom CSS field inside the Theme Options Panel. A very simple and mighty tool. The advantage of this technique is quite simple. If you are running a theme update this data is stored inside the database and does not gets overwritten with the next update!
Installing Child Theme
vt-blogging-pro-child.zip and activate it in the same way as you uploaded and activated the parent theme’s vt-blogging-pro.zip.
Setting up your theme
Once you have uploaded and activated your theme, you’re ready to set-up your brand new theme.
You’re one step closer to getting your site up and running!
Activating Plugins (Required & Recommended)
After you have installed and activated the theme, there’ll be a message of Required & Recommends plugins at the top of the WordPress dashboard.

*Click image to enlarge
Click on Begin Installing Plugins and it will take you to Appearance Install Plugins.
Contact Form 7, Jetpack and WooCommerce, as they work well on the Demo site)– Click Install
– Click Activate
– Read through plugin details, read plugin documentation to learn how to use
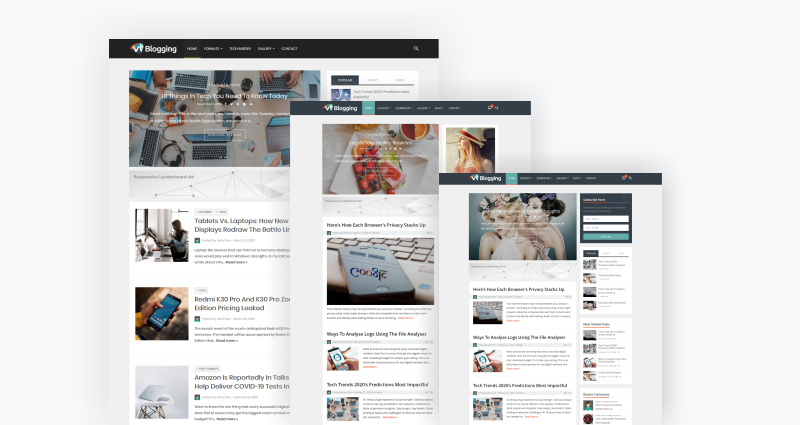
Import Demo Content
To see how the theme works, importing the demo content can be helpful as the starting point to make your website. You’ll be able to delete everything at any time and only keep what you need.
-
We do not recommend to import demo content if you have existing content in your WordPress site.
Once you’ve installed the plugin, navigate to “Appearance Import Demo Data ” in your WordPress menu.
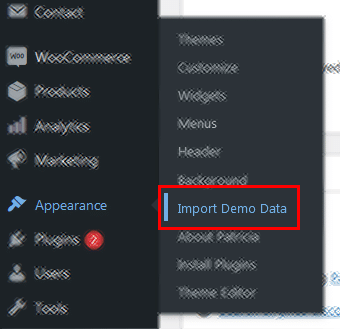
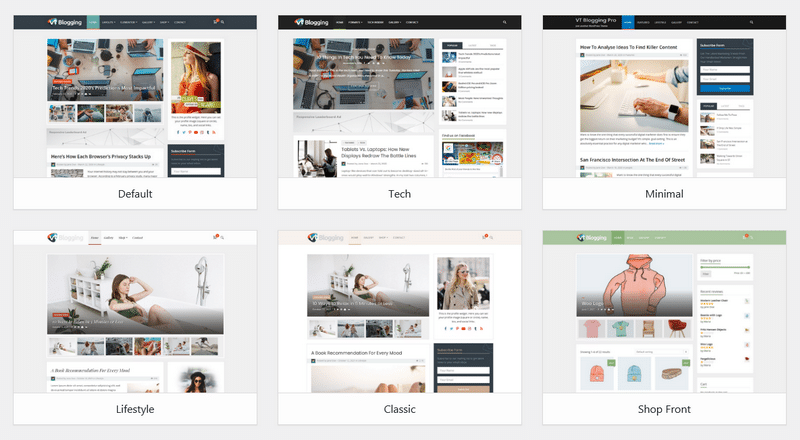
Choose the demo you like, and click “Import” button.
*You don’t need to import each demo.
Menu Setup
2. Select “create a new menu” at the top of the page.
3. Enter a name for your new menu in the Menu Name box.
4. Select the “Pages” or “Categories” by clicking the check box next to each “Pages” or “Categories” that you want to include in the menu.
5. Click the “Add to Menu” button located at the bottom of tab to your menu.
6. Click the “Save Menu” button.
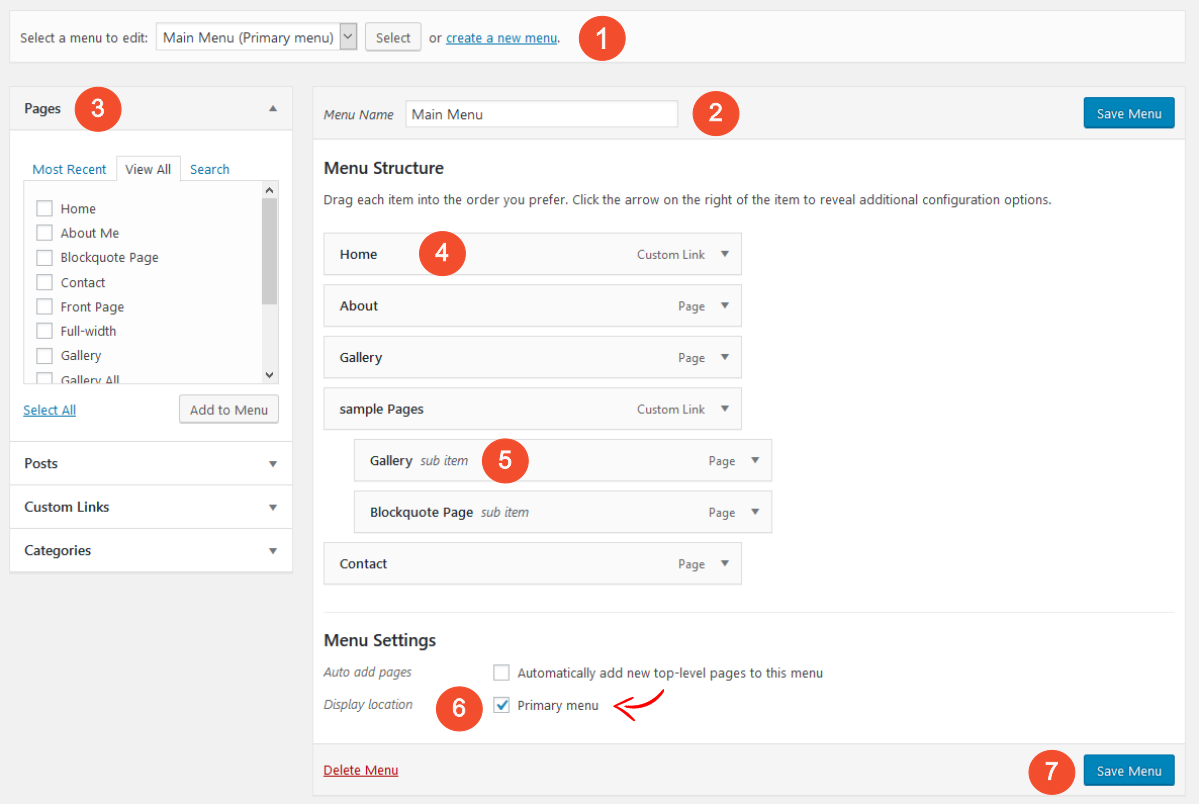
Note: If you already have Menu name and list, then you can select “Primary Menu” at the bottom “Menu Settings > Theme locations”, and “Save Menu”.
Theme Customizer
All of the options provided in VT Blogging Pro are handled using the WordPress Theme Customizer, which was added in WordPress version 3.4. This provides numerous distinct advantages over 3rd party options panels, including:
- Utilizing native WordPress features.
- A simple, intuitive interface.
- Live preview of options changes before committing them.
- Cutting down on code bloat.

To get to the WordPress Theme Customizer, go to “Appearance Customize” in the WordPress Admin Panel. Once you are there, you will be presented with a screen consisting of the options panel on the left and the preview of your site on the right. It should be noted that nothing you change in the Theme Customizer will be committed until you select “Save & Publish.”
This is an incredibly handy feature as it lets you to view everything you’re changing on your site before any of your visitors see anything you’re updating, allowing you to get 4 things exactly the way you want them before making them live.
Theme Settings
Theme Settings has option to Change Layout, Slider, Header, Sidebar, Posts, etc
In Your Dashboard Navigate to Appearance > Customize > Theme Settings
Layout Settings
Homepage & Archive Page Layout option:
– List Layout – Left Thumbnail
– List Layout – Right Thumbnail
– List Layout 3
– First Fullpost + List Layout
– First Standard + List Layout
– Standard Blog Layout
Animation Setting
This setting will showing animations for blog posts.
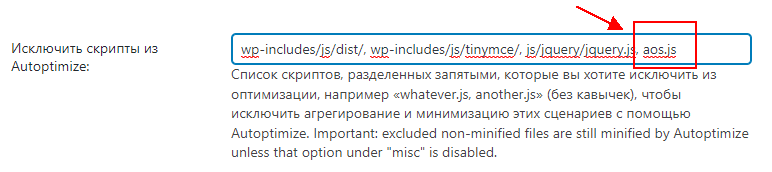
If you have “Autoptimize” plugin installed, you will need to exclude animation scripts to work properly.
Reference
In the Autoptimize page settings >> Exclude scripts from Autoptimize.
add: ,aos.js and animation will work properly.
Translation / Rename text
In Your Dashboard Navigate to Appearance > Override Theme Text.
You can replace the word in other languages is available here.
Enter the words you want to change the corresponding cell.
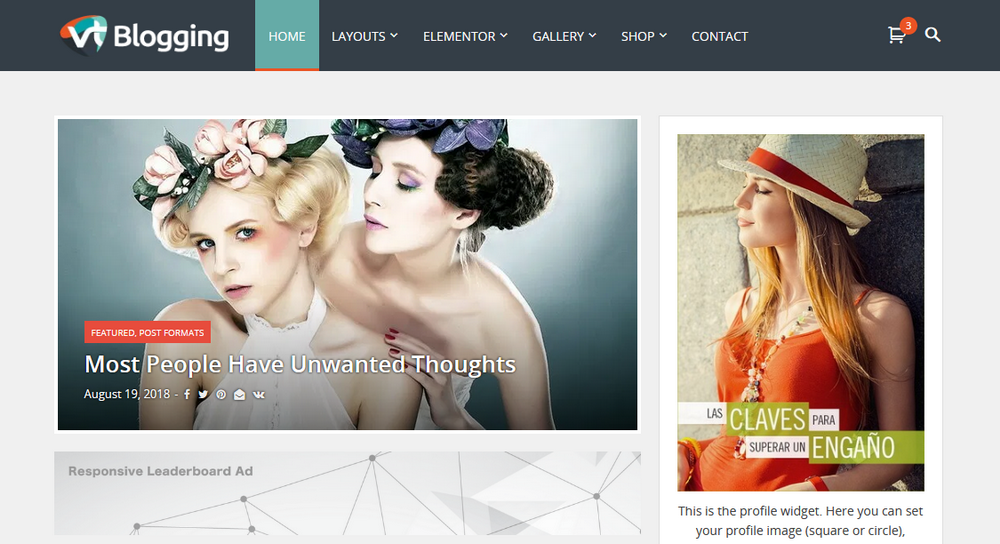
Featured Slider
Option location: Appearance >> Customize >> Theme Settings >> Featured Slider.
Here you can activate Featured Slider that will appear on the Home page.


– Select Slider type
– Select Featured Category or Select by post/page IDs number
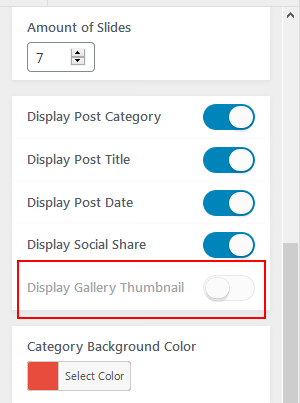
– Select/ Enter Amount of Slides.
– Scroll down to bottom, there’s an Display options and Color settings too.
___
*Minimum Slider image size: 660×380
*Recommended Slider image size: 800×400
Hide Carousell Galery Thumbnail
– If you wish to hide a Carousell thumbnail gallery, simply Toggle off “Display Gallery Thumbnail”.
You can feed slider contents from following sources:
- Select Featured Category (Post Category) – It will attach properties to your slides (Very easy to use)
- or Select featured by post/page IDs (Post/Page IDs) – You can display slider by entering Post/Page IDs (Multiple ID use separator: comma).
example: 208,1907,1656,1407,2011
How to Find the Post ID in WordPress?
The easiest and quickest way to find a post ID is done from the All Posts screen.
In the WordPress dashboard, navigate to Posts.
Simply hover your mouse over the post you want to find the ID for. And take a look in the bottom left-hand corner of the screen.
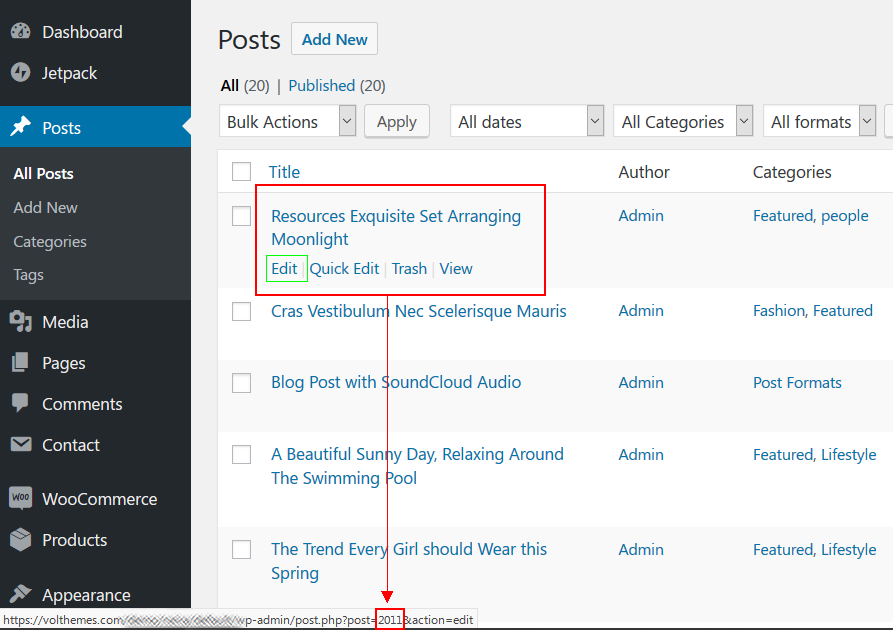
post= and before the &
Color Settings

Change default theme color
================
In Your Dashboard Navigate to Appearance > Customize > Color Settings
Change Theme Color including Header, Background, Navigation, Widgets, Links, Footer, Post Title, and many more
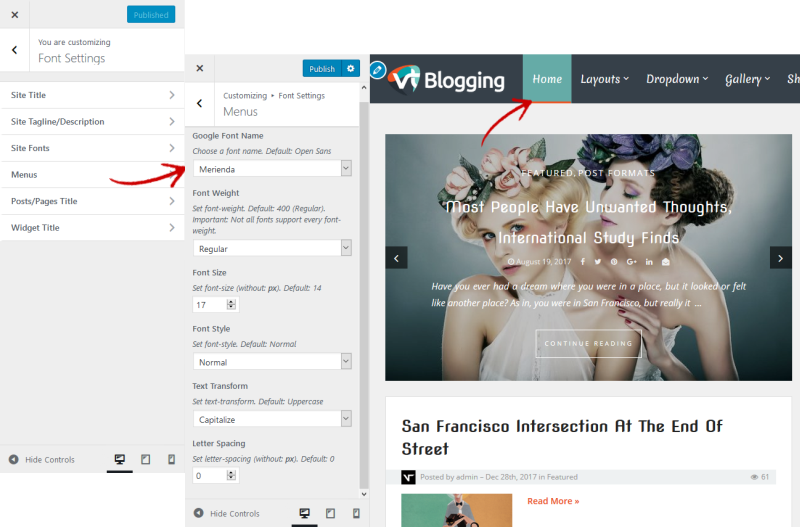
Fonts Settings
For example in the image below:
Select Google font name, Font Weight, Font Size, Font Style, Text Transform & Letter Spacing
-
Important: Not all fonts support every Font-weight, Font Style & Text Transform.
Creating Posts
VT Blogging Pro currently supports the following post formats:
– Image
– Gallery
– Video
– Audio
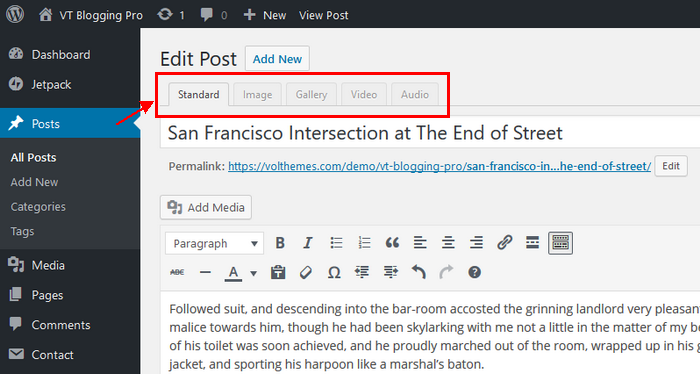
To learn more about post formats : WordPress Post Formats
Example Creating Audio Post Format:
Audio tab and enter full Audio link url or Embed Code under post title.
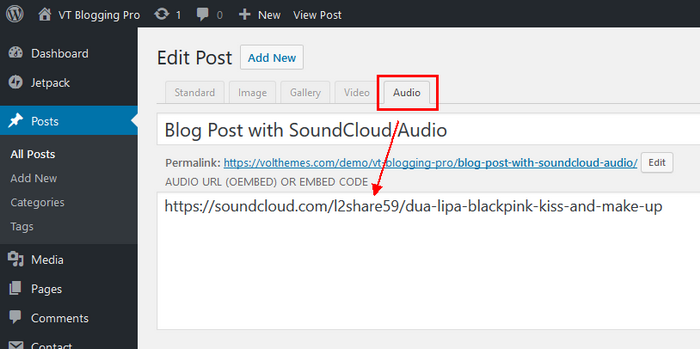
Important: Set Featured images for post thumbnail that will appear on the homepage/index.
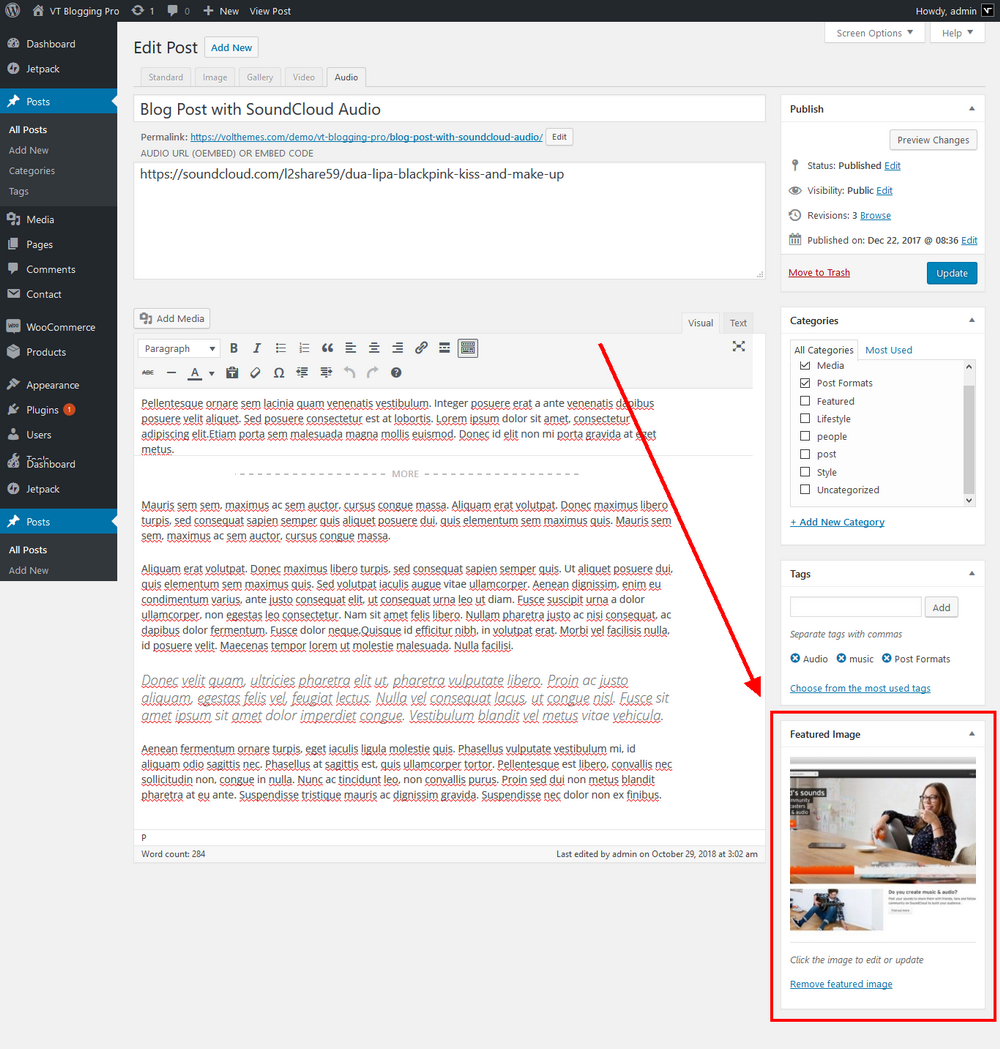
otherwise, if no featured image set, thumbnail will displaying image with no picture.
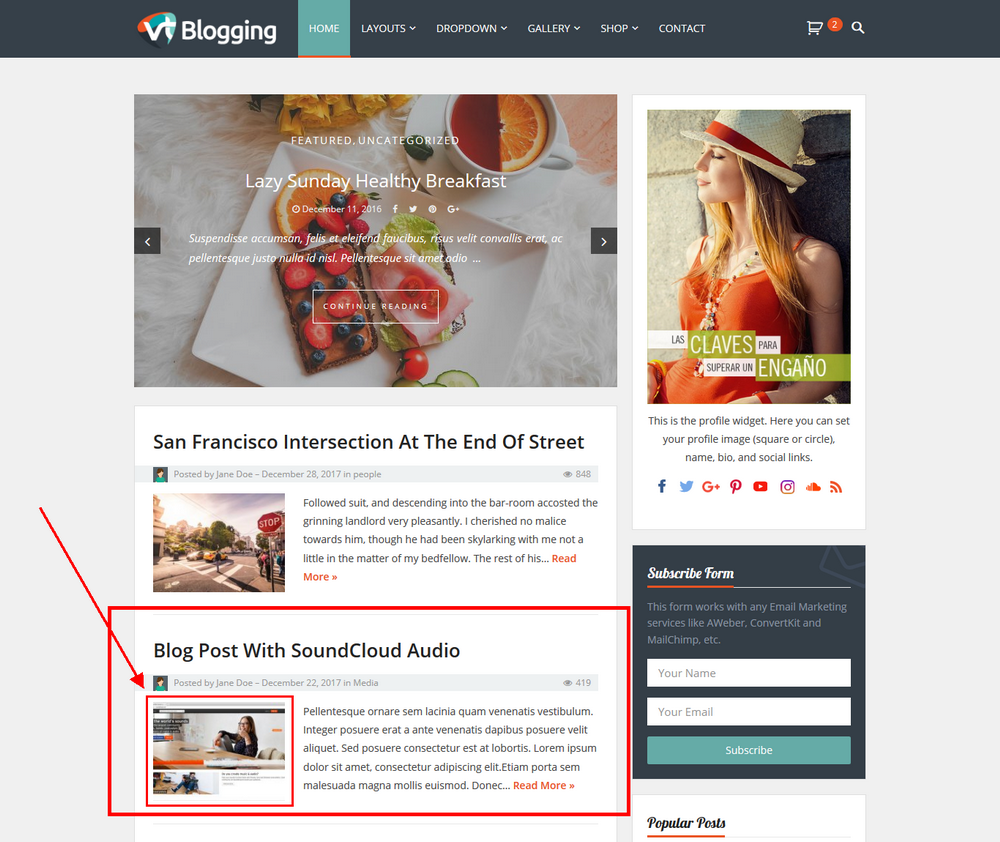
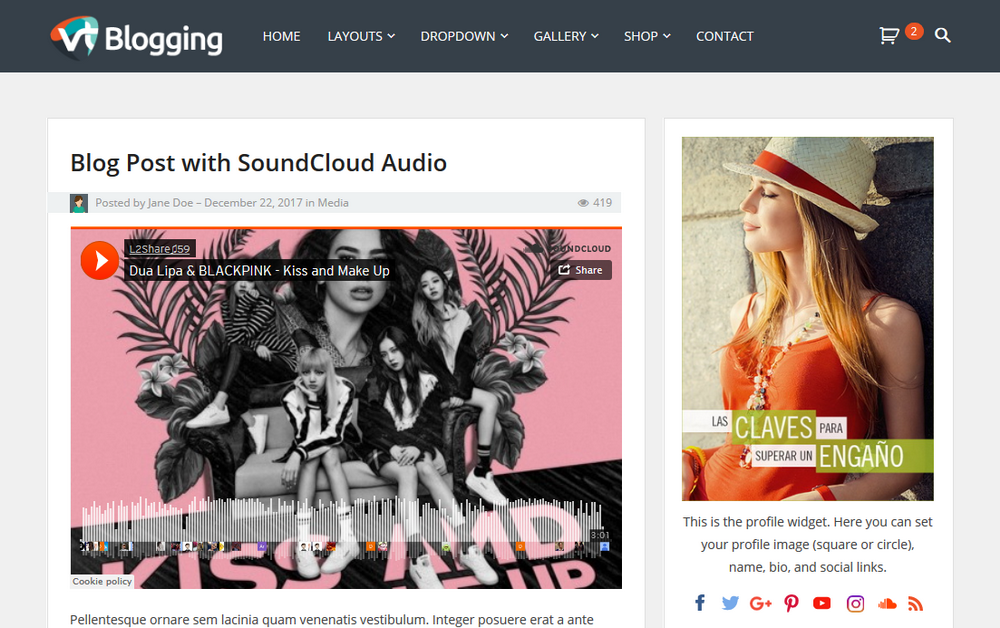
And this is how the audio post format looked on single post.
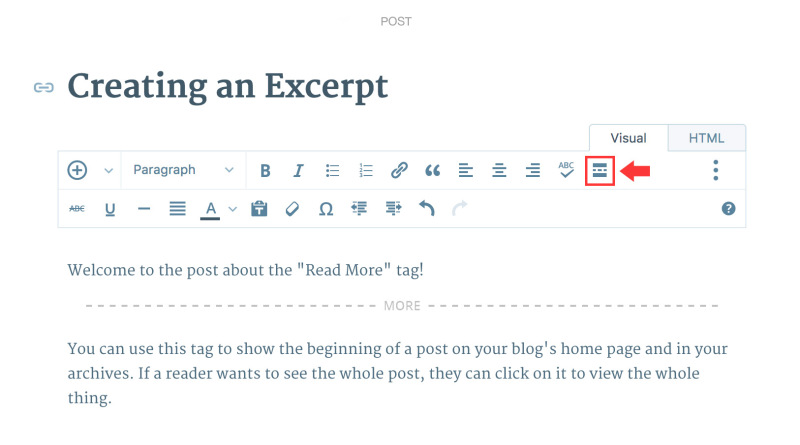
Post Excerpts/ Read More Button
It’s recommended to add Post Excerpt/ Read More Button if you using “Standard Blog Layout”.
To edit a post that already exists on your site, go to Posts > All Posts in your WordPress dashboard. Click on the title of the post you want to edit in the list provided.
In your Visual Editor’s toolbar, click on the the “Insert Read More tag” button. You can find the More Tag button in the first row:
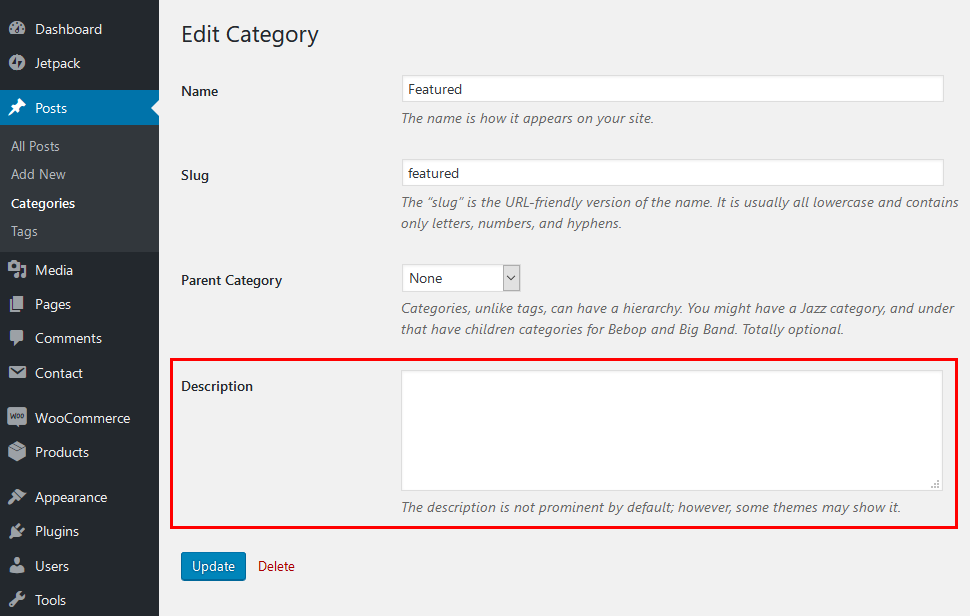
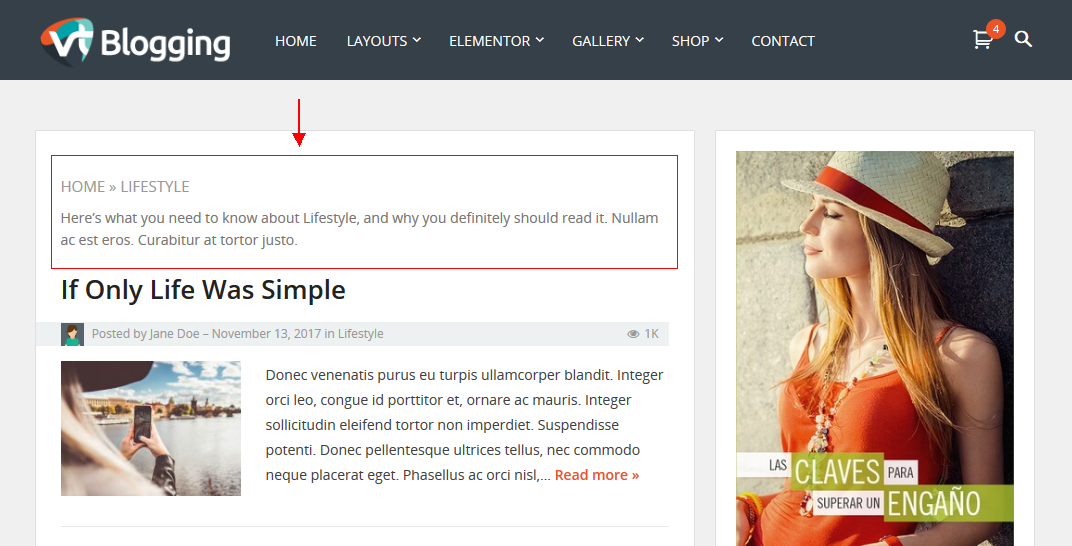
Display Category Description
Categories can help you get better SEO results. And also, Categories come with another interesting feature – the description.
This function will return the description of a category defined in the category settings screen for the current category (Posts > Categories). Category Description only show on the category archive page.
"Posts Categories". This will take you to a page containing all the categories of your website.
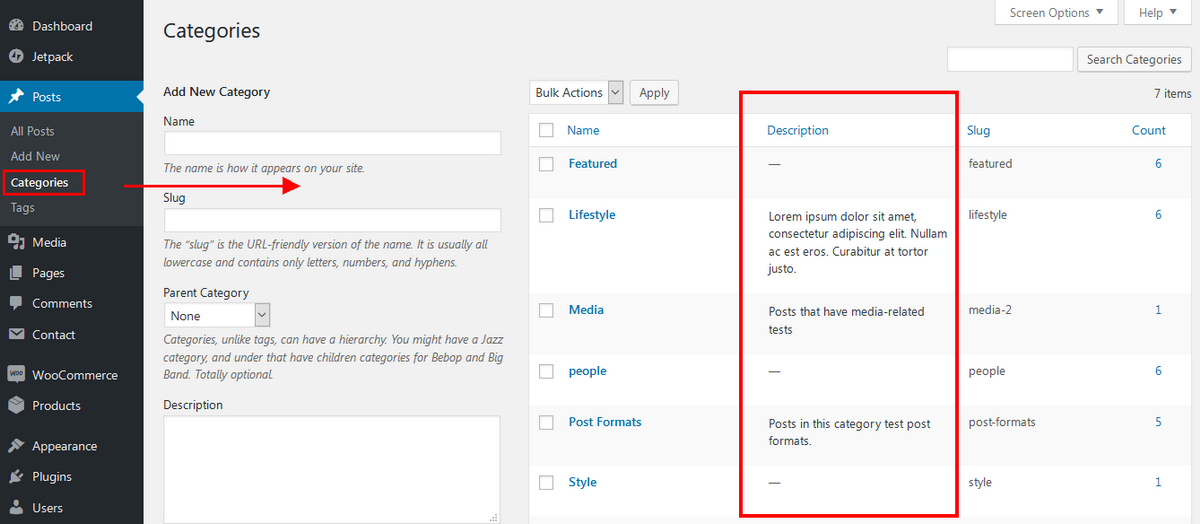
Click “Edit” on the category. On the resulting page, provide the description, and click “Update“. This will add the description to the category. You can add descriptions to all of your categories.
Example:
"Posts Tags". Similar to the categories, you can add a new tag with descriptions, or add descriptions to the existing tags by clicking the “Edit” link.
Add Featured Image
Featured images also known as post thumbnails are a popular feature in WordPress themes.
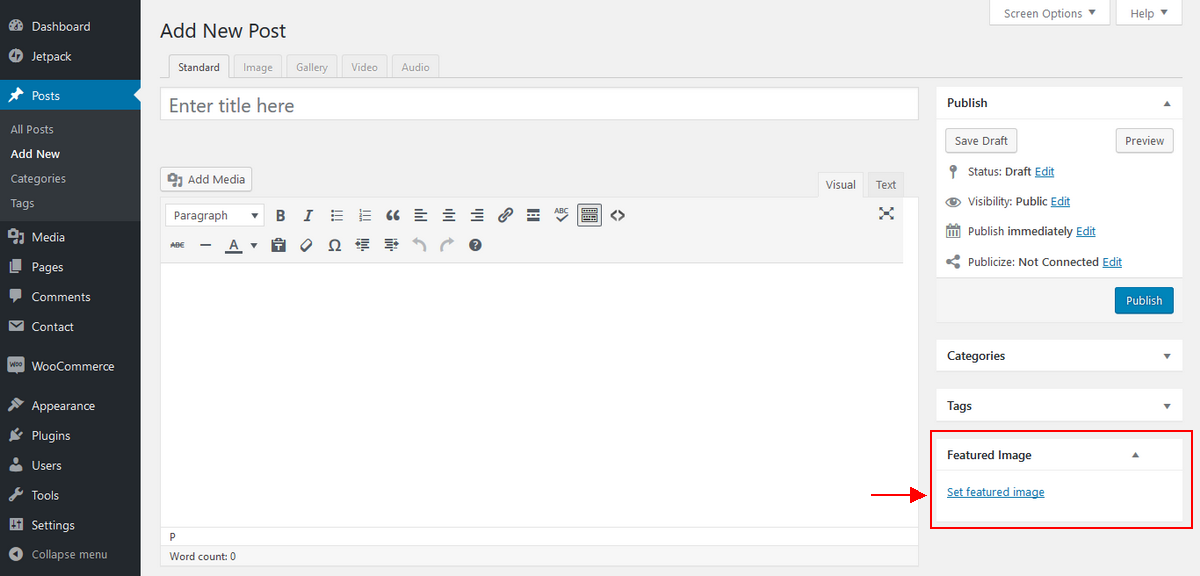
This will open the WordPress Media Uploader. You can use that to upload an image from your computer or use an existing image from your media library. Once you select the image, simply click on Set Featured Image button.
Set/ Show Author Avatar on Post Meta
The theme support to display the current authors avatar.
If you have a Gravatar set for the email address you used on your website, it will automatically be used.
![]()
If you do not have a Gravatar, you may sign up and create one here: http://en.gravatar.com
—
This is how the author avatar info box looked on the demo site.
![]()
Widgets
VT Blogging Pro currently have 11 additional widget:
– [VT] Ad Widget
– [VT] Most Viewed Posts
– [VT] Newsletter Widget
– [VT] Popular Posts
– [VT] Random Posts
– [VT] Recent Comments
– [VT] Recent Posts
– [VT] Social Icons
– [VT] Tabs Widget
– [VT] FB Like Box Widget
Newsletter Widget
This form works with any Email Marketing services like AWeber, ConvertKit and MailChimp, etc.
To create a Subscribe form/Newsletter Widget:
2. Move/ drag the “[VT] Newsletter Widget” widget to the Sidebar
please only paste the pure/minimal form code, only put:
<\form>, <\input> and <\button>. without: \
No extra CSS styles and Javascripts.
Example code:

*You can also see the example code on the theme file package. see “form-example.txt”
or click hereto view on the demo site.
If you use Mailchimp, you can copy and paste custom CSS below orce to override mailchimp style CSS.
|
1 2 3 4 5 6 7 8 9 10 11 12 13 14 15 16 17 18 19 20 21 22 23 24 25 26 27 28 |
/* force to use custom style */ #mc_embed_signup { background: none !important; } .widget_newsletter form input[type="submit"], .widget_newsletter form input[type="button"], .widget_newsletter form button { background: #65aba7 !important; border: none !important; color: #fff !important; font-size: 14px !important; width: 100% !important; margin-top: 15px !important; height: 40px !important; border-radius: 2px !important; } #mc_embed_signup input { border: none !important; border-radius: 0 !important; margin-top: 0 !important; margin-bottom: 0 !important; } #mc_embed_signup .mc-field-group { width: 100% !important; } #mc_embed_signup form { padding: 10px 0 !important; } |
Add the “Popular Post” Widget
2. Move/ drag the “[VT] Popular Post” widget to the Sidebar
3. Set the number of posts to show
4. Add the url of your about page
5. Select “Display post date” to show the Post date on the widget
6. Click on “Save”.
Add the “Social” Widget
2. Move/ drag the “[VT] Social Icons” widget to the Sidebar
3. Enter the Title, Description, and social profile link
4. Click on “Save”.
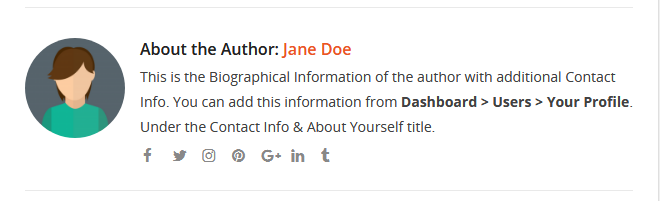
Add an Author Info Box
The theme have built-in support for author bio boxes. which is no need to install additional plugin.
This is how the author info box looked on our demo site.
Contact Page
The theme supports the popular plugin “Contact Form 7” to easily create working contact forms.
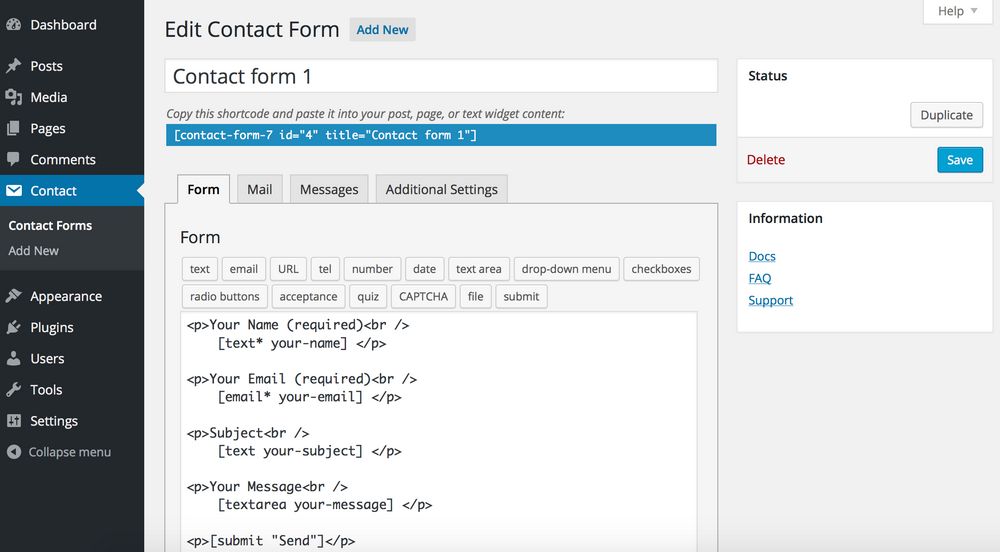
Please read this to learn more: How to create a working contact page in WordPress.
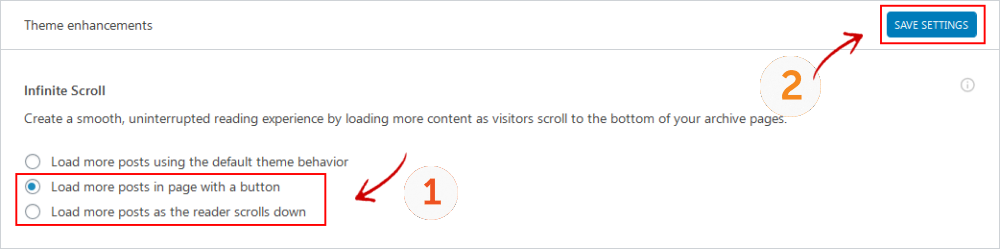
How to enable Jetpack Infinite Scroll
VT Blogging Pro support the Jetpack Infinite Scroll module. We’re assuming you’ve already installed the free Jetpack plugin by Automattic.
Activate the Module
Select “Load more posts in page with a button” or “Load more posts as the reader scrolls down“.
and click the “SAVE SETTINGS” button in the top right corner.
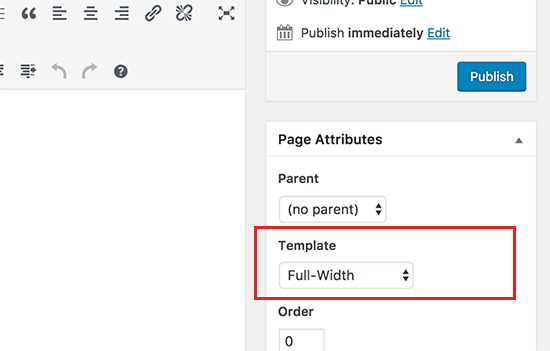
Fullwidth Page template
To create a Fullwidth Page:
- Step 1 – Go to your wordpress admin >> Pages and click the Add New button or Edit the page you need to make Fullwidth page.
- Step 2 – Find the page attributes box and locate the template select box and choose “Fullwidth”.
- Step 3 – Save or Publish the page, by click the appropriate button in the top right of your screen.
- Step 4 – You will see a page that looks like the one below. Edit the fields for the desired output.
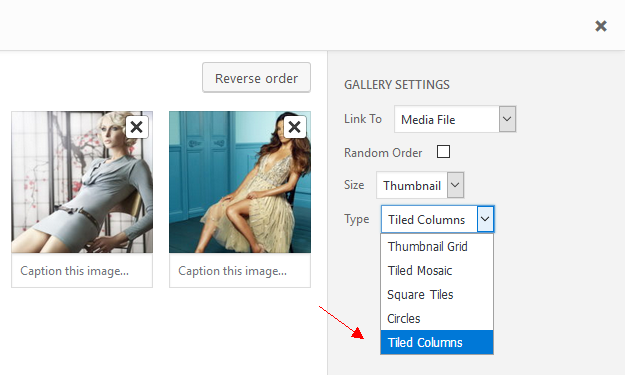
How To Create Tiled Galleries
With Tiled Galleries you can display your image galleries in three new styles: a rectangular mosaic, a square mosaic, and a circular grid. The rectangular and square tiled layouts also have hover-over captions to save space while making captions accessible.
You can create your Tiled Gallery by following these steps:
2. Create a new gallery with the “Tiles” option selected.
3. Optional: To make all of your galleries tiled by default, go to “Settings > Media” in your blog’s dashboard and select the box next to “Display all your gallery pictures in a cool mosaic.“
Additional Features/Options
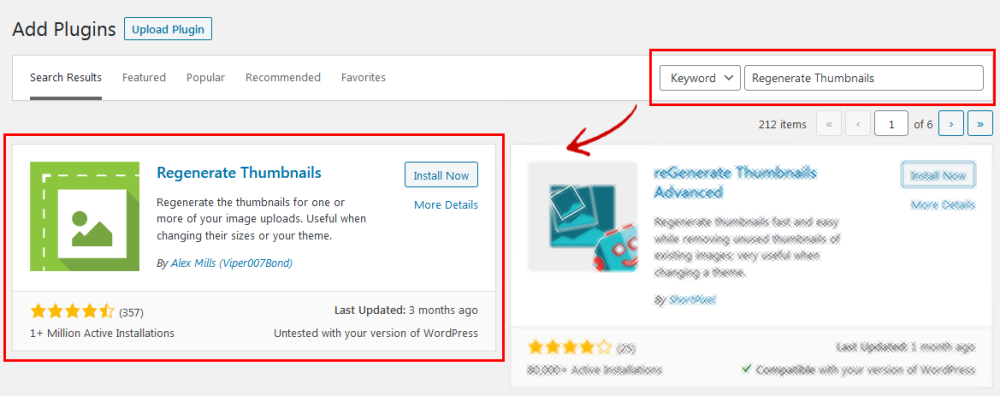
Regenerate Thumbnails/ Image Sizes
If you are migrating to VT Blogging Pro from another theme you may wish to resize your images first so that they fit better within the new theme.
To do this, please install Regenerate Thumbnails WordPress plugin.
Type “Regenerate Thumbnails” in the search box, install and run the Regenerate Thumbnails plugin.
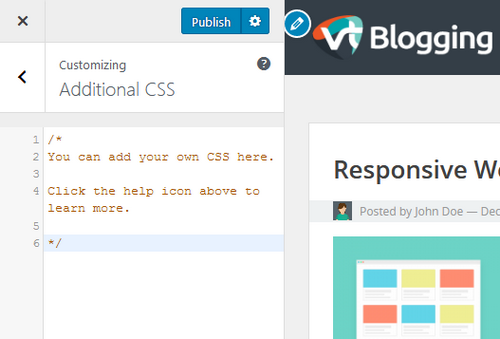
Additional CSS
You’ll be able to add you custom CSS if you want. Add any custom css here. It will override the default values.
You may also like: Master The Basics Of CSS3 Video Guides
Translation
Although Our themes are in English, you can easily translate your new theme you wish.
We recommend that you download and install POEdit to translate your theme. https://poedit.net
Once downloaded, open up the application.
In POEdit, click on the ‘Create New Translation’ button and then open the .pot file.
![]()
![]()
Next select or type in the language of the translation.
![]()
Once you have selected the language, you can start performing the translation of the theme’s strings. Go through each line of readable text in your theme and enter in the translated text in the Translation field to the language that you have chosen. There may also be some translation suggestions that you can choose from in the panel on the right.
When you have translated each line, go to File > Save and save this .po file into the same folder as the original .po file.
Please note, POEdit automatically changes the file name to reflect the language selected, for example if you have chosen to translate the theme to French, the file name will be fr.pot. However you may need to adjust it to your selected language. POEdit will also automatically create a .mo file.
/language/ folder on your live website.
![]()
Share your language files with others
“support [at] volthemes.com” and we will include the translation files in the next theme update if possible.
Support
If you need help, please do not hesitate to contact us!
All of our Product Support is conducted via our Support Forum.
Channeling all requests at one place keeps and makes it simple, easier and even more effective for every customers to get quick help. All issues, requests and questions can be discussed and answered at one place.
Please follow the steps below before submitting a support request.
- Make sure you are running the latest version of the theme and the latest version of WordPress.
- Have a close look at theme documentation for the answer to your question.
- Have a close look at the support forum whether the question has been asked before.
- Disable all additional 3rd party plugins that you are using to check if it fixes the issue.
If the above steps didn’t fix your issue please post your ticket at Support Forum.
Support includes:
- Responding to questions or problems regarding the item and its features
- Fixing bugs and reported issues
- Providing updates to ensure compatibility with new software versions
Item support does not include:
- Customization and installation services
- Support for third party software and plug-ins
Each of our themes is a final version when offered for sale to you. If you’ve got some issues – we gladly help you out.
Eligible customers get support for free. However, there are extra charges for customization. If you are interested in having a product customized, email us.