GETTING STARTED
created: Sept 28, 2015
latest update: Feb 02, 2018
Support
All of our Free Themes are handled exclusively through the official WordPress.org Support Forum
Please follow the steps below before submitting a support request.
- Make sure you are running the latest version of the theme and the latest version of WordPress.
- Have a close look at theme documentation for the answer to your question.
- Have a close look at the support forum whether the question has been asked before.
- Disable all additional 3rd party plugins that you are using to check if it fixes the issue.
If the above steps didn’t fix your issue please create an account or login on the WordPress.org Support Forum.
Support includes:
- Responding to questions or problems regarding the item and its features
- Fixing bugs and reported issues
- Providing updates to ensure compatibility with new software versions
Item support does not include:
- Customization and installation services
- Support for third party software and plug-ins
Installing Theme
Installation Requirements
To install your new theme you must have a working version of WordPress* already installed installed on your self-hosted site.
For information on how to install the WordPress software, please visit WordPress Codex – Installing WordPress.
-
This theme required WordPress at least 4.1+. It’s highly recommended that you have the latest version of your WordPress installed.
Theme Installation Process
You can install Kerli Lite WordPress theme through your WordPress dashboard, like you would do with any other WordPress theme.
- Log in to your WordPress site
- Go to Appearance >> Themes
- Click Add New Theme
- Type “Kerli Lite” into the search field on the right side
- Click install to install the theme.
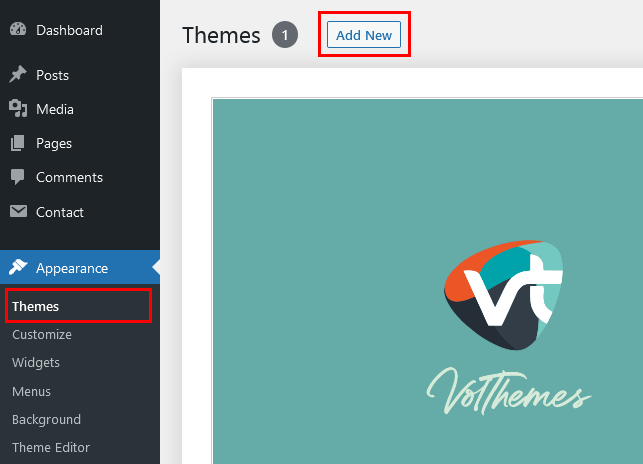
When the theme installation is finished you should see a message “Theme installed successfully”. Click Activate to activate the theme.
Go to Appearance > Customize: to get started customizing theme.
In case you are new to WordPress, you can find instructions regarding the theme installation in this tutorial: Using Themes in WordPress.
Menu Setup
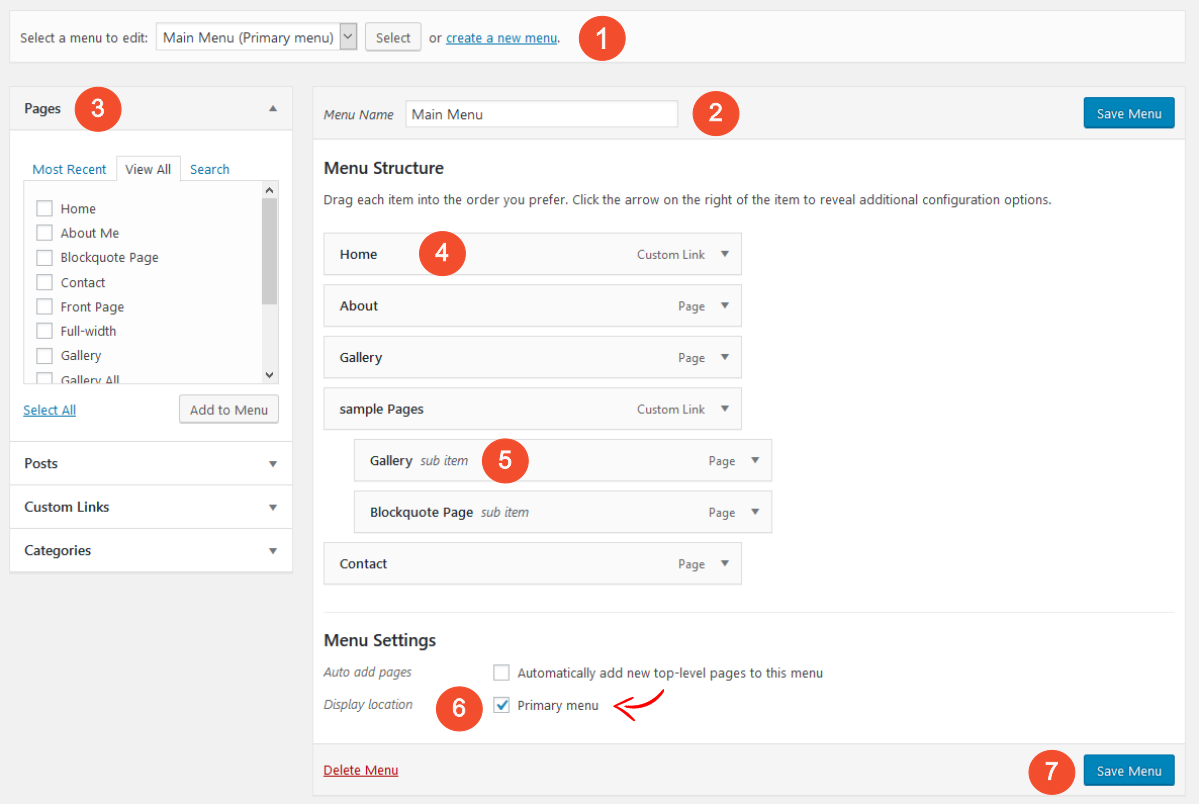
1. Go to “Appearance > Menus”
2. Select “create a new menu” at the top of the page.
3. Enter a name for your new menu in the Menu Name box.
4. Select the “Pages” or “Categories” by clicking the check box next to each “Pages” or “Categories” that you want to include in the menu.
5. Click the “Add to Menu” button located at the bottom of tab to your menu.
6. Click the “Save Menu” button.
Note: if you want a new menu just click “create a new menu”, then you can move the items from the left side. At the bottom “Menu Settings > Theme locations”, checklist “Primary Menu” and “Save Menu”.
Add the About Widget
1. Go to Media > Add New
2. Click on “Select Files”
3. Upload a square image of you. (Ideal size 250x250px)
4. Click on “edit”
5. Copy the link from “File URL”
6. Go to “Appearance > Widgets”
7. Move the “[Kerli] About Widget” to the Sidebar
8. Paste the url in the “Image URL”
9. Write a text in “About Description”
10. Add the url of your about page
11. Click on “Save”
Add Custom Post Widget
1. In the “Appearance > Widgets”
2. Move/ Drag the “[Kerli] Custom Post” widget to the Sidebar
3. Select a Category you want to display or use Filter Posts by Tags
Add Social Profile Widget
1. In the “Appearance > Widgets”
2. Move/ Drag the “[Kerli] Social Links” widget to the Sidebar
3. Enter your social links to displaying social icons in the sidebar. (Leave blank text boxes to not display icons).
Add Featured Post
Featured images also known as post thumbnails are a popular feature in WordPress themes.
Simply create a new post and scroll down a little to see if there is a meta box called featured images on the right hand side of the screen.
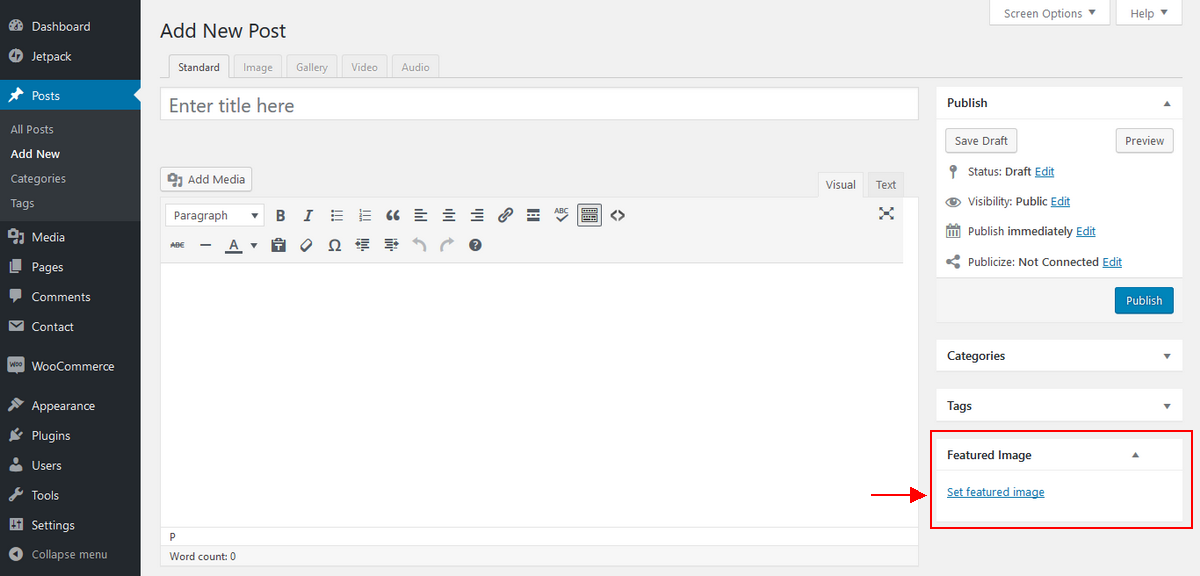
To add a featured image in a WordPress post, simply click on “Set Featured Image” link inside the featured image meta box shown in the screenshot above.
This will open the WordPress Media Uploader. You can use that to upload an image from your computer or use an existing image from your media library. Once you select the image, simply click on Set Featured Image button.
Customize/ Theme Customizer
All of the options provided in Kerli theme are handled using the WordPress Theme Customizer, which was added in WordPress version 3.4. This provides numerous distinct advantages over 3rd party options panels, including:
- Utilizing native WordPress features.
- A simple, intuitive interface.
- Live preview of options changes before committing them.
- Cutting down on code bloat.
To get to the WordPress Theme Customizer, go to “Appearance Customize” in the WordPress Admin Panel. Once you are there, you will be presented with a screen consisting of the options panel on the left and the preview of your site on the right. It should be noted that nothing you change in the Theme Customizer will be committed until you select “Save & Publish.”
This is an incredibly handy feature as it lets you to view everything you’re changing on your site before any of your visitors see anything you’re updating, allowing you to get 4 things exactly the way you want them before making them live.
CUSTOMIZE: HEADER IMAGE
In the “Appearance > Customize > Header Image”, you can upload a custom header image. The Customizer tells you the sizes suggested.
- Click on “Add new image”
- Click on “Select files”
- Select your header image (or logo)
- Click on “Select and Crop”
- Save & Publish to apply changes.
KERLI OPTIONS
Top Bar and Social Icons
– Option to display or hide for blog title in the top bar.
– Enter your social profile link URL. The following networks are supported in the lite version: Twitter, Facebook, Google+, Linkedin, YouTube, Instagram and Pinterest. Leave blank text boxes to not display icons.
Logo in the Header
– If you use a logo instead of full image for the header, check the option “Header image is a logo” to apply margins.
– Check the option “Center logo” to make the logo position to center.
Color Settings
You can change the colors of sections: Body Font Color, Link Color, Link Hover Color, Site Title and Headings.
Contact Page
The theme not included a “Contact” page template with an additional sidebar to display a different sidebar on your contact page than on other posts and pages. Kerli lite Theme also supports the popular plugin “Contact Form 7” to easily create working contact forms with only a few clicks. Please read this to learn more: How to create a working contact page in WordPress.
Additional Features/Options
If you have followed the above mentioned steps of this documentation, you have completed the basic theme setup of Kerli lite WordPress Theme. Now you can start creating amazing content. You can access the Kerli Dashboard at “Appearance => Kerli Dashboard”, or access the theme options panel directly through your WordPress dashboard at “Appearance => Customize ”, there you will find these sections:
- Kerli Options
- Top Bar and Social Icons
- Logo in the Header
- Color Settings
- Site Identity
- Colors
- Header Image
- Background Image
- Menus
- Widgets
- Static Frontpage
Additional CSS
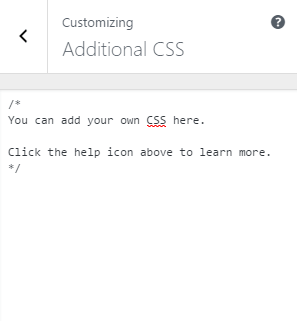
To add additional CSS go to “Appearance > Customize > Additional CSS” and simply put your CSS here.
Upgrade to Kerli Premium
If you would like to have more features and options, you can upgrade to the premium version and benefit from more awesome features and excellent theme support.
Configure your own news website or blog within a few minutes and benefit from endless possibilities to customize your website. Learn more about the premium version of Kerli WordPress Theme.


